Estimated reading time: 15 minutes.
As a application developer, are you dazzled by all those cutting age fancy terminologies and jargons? If you are a Javascripter, lucky you, Node.js definitely will help you manage the back-end during your AppDev process. If you are new to eCommerce platform App development domain, it's imperative to understand and get your hands dirty on the construction of API. There are several ways to build API, today I will use Node.js (based on Javascript language) to build a CRUD API.
Don't worry, let's get to some basic concepts before we hit on the road.
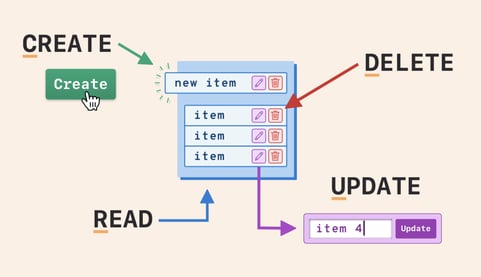
What is CRUD?
CRUD stands for Create, Read, Update, and Delete.
- Create - To insert any record to the database.
- Read - To retrieve records from the database.
- Update - To update a record in the database.
- Delete - To delete a record in the database.
Express is one of the most popular web frameworks for node.js. It is built on top of node.js http module, and adds support for routing, middleware, view system etc. It is very simple and minimal, unlike other frameworks that try do way to much, thereby reducing the flexibility for developers to have their own design choices.
Mongoose is an ODM (Object Document Mapping) tool for Node.js and MongoDB. It helps you convert the objects in your code to documents in the database and vice versa.
Table of contents:
- Create a Node project
- Create an employee model
- Create API
- Read API
- Update API
- Delete API
- Deployment (a topic for next time)
Creating a Node Project
To begin with, let's create a simple Node project named crud.
mkdir crud
cd crud/
npm init -y
touch index.js
package.json
"scripts": {
 "start":"node index.js",
  "test": "echo \"Error: no test specified\" && exit 1"
},
After creating it, install all the required packages like express, body-parser, and mongoose.
- express - To structure our web application to handle multiple different HTTP requests.
- body-parser - To read the request body and to parse it into JSON format.
- mongoose - To connect with MongoDB.
npm install express
npm i body-parser
npm i mongoose
Once done, create the server file. To do that, copy the below code to your index.js file.
index.js
const express = require('express')
var app = express()//Route
app.get('/',function(req,res){
res.send('hello world')
})//MongoDB connection
mongoose.connect('mongodb://localhost/test', {useNewUrlParser: true});
mongoose.connection.once('open',function(){
console.log('Database connected Successfully');
}).on('error',function(err){
console.log('Error', err);
})//Server
app.listen(8000,function(){
console.log('Server is Up')
})
Just by starting the server, you should see hello world getting displayed on the browser.
npm start
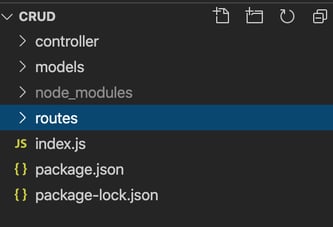
Also, create three other folders named Controller, Routes, and Models. My project structure looks like this.
Creating an Employee Model
To perform any database operation, the first thing we need is a schema. So let’s create it first.
Below, I have created an Employee schema with attributes empName, empEmail, and empMobile.
Models/emp.js
const mongoose = require('mongoose')const empSchema = new mongoose.Schema({
 empName: {
 type: String,
 required: true
 },
 empEmail: {
 type: String,
 required: true
 },
 empMobile: {
 type: String,
 required: true
 },
})module.exports = mongoose.model('Emp', empSchema)
Create API
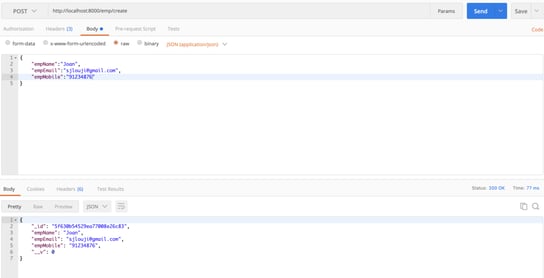
Now let’s start creating a restful API. Initially, I am creating a Create API that inserts an employee recorded into our MongoDB database.
So, to do that, I am creating a routes file named emp.js where we write all our routes for the employee Model.
Routes/emp.js
const express = require('express')
var router = express()
const create = require('../controller/emp')
const bodyparser = require('body-parser');router.use(bodyparser.json())
router.post('/create',create.create)module.exports = router
The below code gets the request and response from the route and it creates an Emp object. Once created, it saves the object to MongoDB. If any error occurs, it is also handled automatically.
Controller/emp.js
const Emp = require('../models/emp')
const mongoose = require('mongoose')function create(req,res,next){
let empName = req.body.empName;
let empEmail = req.body.empEmail;
let empMobile = req.body.empMobile;
let emp = new Emp({
empName,
empEmail,
empMobile
})
emp.save().then((data)=>{
res.send(data)
})
}module.exports.create = create
Once done, call the employee route in the server file with a prefix /emp.
index.js
const router = require('./routes/emp')app.use('/emp',router)
Read API
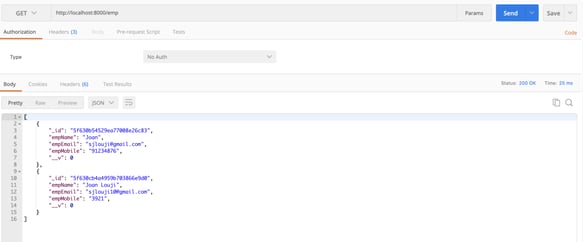
Now let’s retrieve all the data that are stored in the database. To do that, create a new route.
Routes/emp.js
const express = require('express')
var router = express()
const create = require('../controller/emp')
const view = require('../controller/emp')
const bodyparser = require('body-parser');router.use(bodyparser.json())
router.post('/create',create.create)
router.get('/',view.view)module.exports = router
After creating the route, create a new function named view in the employee controller. Just by calling the function find, we can retrieve every record from the collection.
Controller/emp.js
const Emp = require('../models/emp')
const mongoose = require('mongoose')function create(req,res,next){
 let empName = req.body.empName;
 let empEmail = req.body.empEmail;
 let empMobile = req.body.empMobile;
 let emp = new Emp({
 empName,
 empEmail,
 empMobile
 })
 emp.save().then((data)=>{
 res.send(data)
 })
}function view(req,res,next){
 Emp.find({}).then((data)=>{
 res.send(data)
 })
}module.exports.create = create
module.exports.view = view
On visiting the URL https://www.shoplazza.com/emp, you will see all the employee values getting displayed.
Update API
To create an update API, create another route as done above. To update a record, we make a patch or a put request.
Routes/emp.js
const update = require('../controller/emp')router.patch('/:id',update.update)
Now move towards the employee controller and create a new function named update which will update the employee record.
To update a record, we should find if the record exists in the database. This can be done by the findByIdAndUpdate method wherein we have to pass the _id of the record and the values, we want to change.
Controller/emp.js
function update(req,res,next){
 Emp.findByIdAndUpdate(req.params.id,req.body, (err,emp)=>{
 if (err) {
 return res.status(500).send({error: "Problem with Updating the Employee recored "})
 };
 res.send({success: "Updation successfull"});
 })
}module.exports.update = update
Make a Patch request to https://www.shoplazza.com/emp/<id> with the data to be changed. This will update the employee record.
Delete API
Creating a Delete API view is the most simple one out of all. To delete a record from a database, we make adelete request. As we did earlier, create another route for deleting a record. The route should have a parameter id that tells which record should be deleted.
Routes/emp.js
const remove = require('../controller/emp')router.delete('/delete/:id',remove.remove)
Inside the controller, create a function named remove for deleting employee records from the database. Deleting a record can be done using the findByIdAndDelete method which is similar to the findByIdAndUpdate method. It also requires the same _id.
Controller/emp.js
function remove(req,res,next){
 Emp.findByIdAndDelete(req.params.id, (err,emp)=>{
 if(err){
 return res.status(500).send({error: "Problem with Deleting the
Employee recored "})
 }
 res.send({success: 'Employee deleted successfully'})
 })
}module.exports.remove = remove
On making a delete request to the URL https://www.shoplazza.com/emp/delete<id>, you can delete any record from that database.
There are many choices to deploy your applications, such as Heroku, we will discuss it next time.
Well, that's about it. Stay tuned with SHOPLAZZA blog! Happy coding time!