Here’s a comprehensive guide with everything you need to know on how to start an online store with Shoplazza. Keep reading to find extra powerful tips and make your store really pop!
How to start an online store with Shoplazza in 10 steps
If you’ve stumbled upon this post, then you’re likely in one of these two scenarios:
- You’ve just taken the plunge and decided to open an online store, or
- You already have an online store, but you’re unsatisfied with your current set-up and want to find a new solution.
Or maybe you’re just looking for more info on how to start an online store. That’s cool, too: We know that opening an ecommerce business of your own can be scary. After all, there’s a lot to consider.
You need to do the math to figure out if now’s actually the time to make the move. Then, there’s the whole matter of deciding where the store will be hosted online and how it will be managed. You’ll also have to decide what you’ll sell online, who your ideal customers are… Not to mention the logistics of it all, like shipping and taxes.
Or, who knows, maybe there’s a fourth scenario: You already know how to start an online store, but you’re thinking about scaling your business. We can help out with that, too.
To keep it short, sweet, and show you how cool we are: Hey, we just met you. And this is crazy. But here’s an online ecommerce platform, so… Try us, maybe?
This post was designed to be your loyal guide and helping hand on how to start an online store. It’s also filled to the brim with recommended reads and useful videos, so let’s dive in!
How to start an online store: table of contents
- Choose the right ecommerce platform
- Add products to your ecommerce store
- Create product pages
- Choose and customize your theme
- Set up payment solutions and sales tax
- Create About page and set up policies
- Set up shipping
- Monitor your store’s performance
- Extra tips on how to start an online store with Shoplazza
- Shoplazza exclusives for your ecommerce business
1. Choose the right ecommerce platform
Starting an ecommerce business involves making a lot of big decisions. And one of the first ones you’ll need to make is: Which platform will you use?
More than just a website builder, an ecommerce platform is where you’ll run your online business. It’ll be where the website is hosted, sure, but it’ll also be where you manage your inventory, edit your product pages, source new products, ship your products, communicate with customers, collect meaningful data and important insights and so, so much more.
That’s exactly why it’s so important to pick a platform that’s reliable and robust. Here’s what Shoplazza can offer you:
- Easy migration: Merchants who have already created online stores in other ecommerce platforms can make the transition to Shoplazza with just a couple of clicks. We have a tool that imports all of your products easily and seamlessly so you don’t have to waste time doing that manually.
- Compatibility with different business models: DTC, B2C, dropshipping, print on demand… Shoplazza supports a ton of different business models. We offer tailor-made solutions and apps to help your business thrive.
- Comprehensive admin tools: Shoplazza has a ton of comprehensive admin tools and resources, such as free themes to glam up your store, an overview of sales data, ERP and metrics on orders, shipments, and more.
How to start an online store with Shoplazza: Create an account
You won’t get too far with this online store idea if you don’t create an account on Shoplazza first.
To make your life easier, creating an account with us is pretty simple: All you have to do is punch in some pretty standard info and answer some important questions about your business. If you have a Google account, it’s even easier — all you have to do is click on a button.
Here’s how you can create your account with Shoplazza:
Cool, right? Once the account is created, you’re automatically redirected to the store’s admin, which means you can start tackling the next steps.
🔥 Oh, and have you noticed? You can set up your store and test all the features without having to pay a dime. That’s because here at Shoplazza you can enjoy a free 7-day trial before committing to a plan.

Pick a name and a domain
Now that you’ve picked out an ecommerce platform, it might be a good time to select a store domain and decide on a name for your business.
Remember that the default configuration creates a myshoplaza.com domain for your store just so you can get things off the ground. To build a trustworthy business, it might be wise to purchase a domain or so you can use domains like .com, .net, .io, .shop or similar ones.
You’ll be able to edit this info on the field Store link.
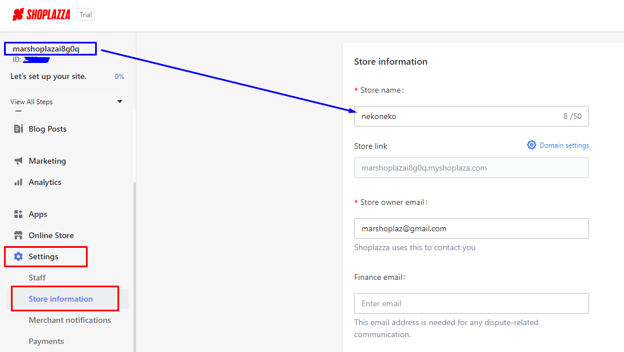
Another thing you might want to tweak is your store name, since it’ll be configured automatically based on the user name you created when you signed up. To adjust that, just go to Settings > Store information.
If you’re out of ideas for a business name, check out our business name generator and hundreds of suggestions for your niche.

📝 How to start an online store with Shoplazza: read this, too!
- Choose the Right Platform for Your eCommerce Store
- Best Ecommerce Platforms for Dropshipping
- Shoplazza Admin Guide (Help Center article)
2. Add products to your ecommerce store
Okay, now it’s time we start tackling the specifics of how to start an online store.
Our Shoplazza website will take you to the admin right after you create your account. There’s a reason for that: The admin is where most of your work will take place.
Shoplazza’s admin is where entrepreneurs can add products, build their ecommerce store and set up everything related to their online businesses. So let’s start with the big one: Adding a product to sell.
When it comes to adding a product to online stores within Shoplazza, you’re mainly looking at three different possibilities:
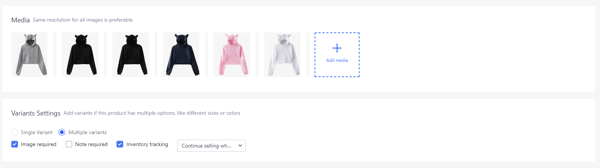
- Manually adding products. If it’s your first time selling online and you’re planning to develop your own products, then you’ll have to manually add them to your store. This process involves uploading images, inserting descriptions, setting up product variants and more. You can check out our dedicated Help Center article to see how it’s done.
- Importing products with a dropshipping app. This is the fastest and easiest way to start selling, and we’ll cover it below.
- Migrating a store’s catalog from another ecommerce platform. You can do a whole store migration or just import a .CSV file to the admin.
Adding a dropshipping product to a Shoplazza ecommerce store is super easy. Check out the video below for a quick tutorial:
💭 Just remember: To import products from dropshipping suppliers, you need to first install a dropshipping app on your store and then sync that account with your store. In the example above, we used CJ Dropshipping.
📝 How to start an online store with Shoplazza: read this, too!
- Add Products to Your Store (Help Center article)
- Beginner's Guide to Dropshipping (Help Center article)
😵💫 Still haven’t decided on a product? Here are some pointers for you to consider:
- Search for trends: It’s always a good idea to do market research and monitor market trends with tools like Google Trends. You’ll likely stumble upon a product or niche that hasn't crossed your mind, especially because you’ll be able to notice what customers are searching for.
- Pick a niche: Working with a niche is always good business, since it’ll allow you to take your pick inside a sea of online shoppers. It’ll also help with marketing strategies because you’ll be able to easily segment your campaigns and pin your target audience down.
- Run a competitive analysis to make sure your business idea can really take off and compete against similar brands on the market.
3. Create product pages
We’ve still got a long road to cover on the topic of how to start an online store with Shoplazza. But before we start talking about shipping, profit margins and search engines, let’s talk about product pages, product photography and product descriptions.
The product page is where your new and existing customers will go to when they’re looking for something to buy. It’s a crucial page to have because that’s where they’ll likely add an item to their shopping cart.
And, to make sure they really do hit the “Add to cart” button, you need the almighty combo of product photos and product descriptions. Let’s see how they can can contribute to a great shopping experience:
- Product photos can serve two different purposes. The first one is that they’ll help customers see the quality of your product (for instance, the fabric and the print of clothes, if you’re a garment store). But a good photo can also help customers to visualize themselves wearing the product you’re selling. This means that you’re not just selling a product. You’re also selling a lifestyle.
- Product descriptions, for their part, translate the aesthetic feel of the photos into words. Ideally, you want to create a small story about your product and then provide technical details about it too, because then your customers can make an informed decision.
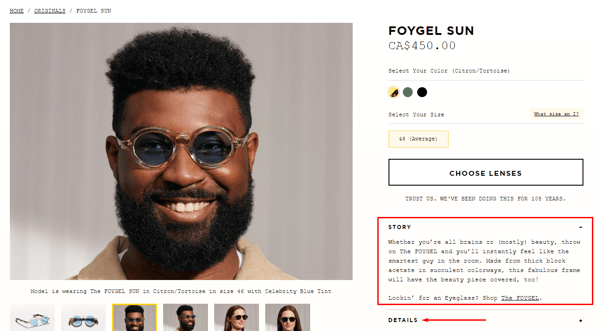
A product page from Moscot, a New-York based store that beautifully showcases a great array of product photos. Their product descriptions are divided into two sections: “Story” and “Details”.
How to start an online store: Create a product page on Shoplazza
If you’re thinking that creating a product page involves having to deal with a lot of coding, we’ve got news for you! Entrepreneurs working on the Shoplazza admin won’t have to edit not even one tiny little line of code.
All the work happens directly in the Product tab of the admin. That’s where you’ll add both photos and descriptions, as we can see in the video below:
👀 Did you notice how there was already a pre-formatted text before we edited the page with a more concise and appealing description? That’s because we’ve imported our product with a dropshipping app. Whenever you do that, you’ll also import your supplier’s product description and photos, too:
While it’s great to have some photos already in place, we do recommend that you be careful with product descriptions. Some of these descriptions created by dropshipping partners tend to be repetitive and artificial, and that’s hardly the vibe your online business is trying to send out, right?
📝 How to start an online store with Shoplazza: read this, too!
- Learn How To Create a T-Shirt Mockup For Your Store
- How To Create a Product Collection (Help Center article)
- How To Add or Update Products (Help Center article)
- How To Edit Product Inventory (Help Center article)
4. Choose and customize your theme
A good ecommerce business doesn’t rely solely on the aesthetic of product pages: It also boasts a complete look and some important settings that will allow customers to do some online shopping.
Among the features you need to focus on while learning how to start an online store are:
- Theme
- Checkout
- Sales tax
- About us page
- Important policies
We’ll cover each of those topics below, so keep on reading!
How to start an online store with Shoplazza: Set up a theme
Having a nice theme is really important for any type of business, no matter how big or small.
A theme can do a lot more than just help you create a nice look for your ecommerce site―it can also strengthen your branding and serve as an online storefront, showcasing all that you’ve got to offer.
The best scenario here is that you establish the same visual identity for your whole branding. This means, for instance, using the same shades of orange and red on the website, on your logo and on your social media channels, too.
We kid you not: Applying a Shoplazza theme to your online business just takes two clicks.
To set up your theme, go to Online Store > Themes. All Shoplazza templates are completely free to use, so check out below how you can select and apply your favorite theme.
Now check out what you have to do to edit the theme. We’re just making some really minor edits here because the time you spend editing a theme will depend on how much you want to tweak it. This is just so you can get the jist of it. Again, everything can be done with a couple of clicks:
✒️ Don’t forget that it’s also possible to edit the headers and all of the text you see in the theme. To do that, simply click on the block of text you want to edit and then make the corrections necessary on the left-hand menu:
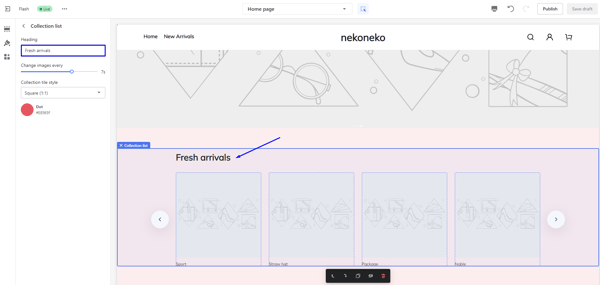
A screenshot of the theme we’ve just edited. To tweak “Fresh arrivals”, simply click on the block that’s marked with a blue arrow and then edit the field “Heading” on the left-hand menu.
5. Set up payment solutions and sales tax
Set up a payment solution
Customers can’t shop if they can’t pay for it, right? That’s why our “how to start an online store” guide has to have a section on how to add a payment solution, too.
Go to Settings > Payments. There, you’ll see a screen much like the one below, with all the payment providers available on Shoplazza. Click on Add payment provider to add your first solution, and remember to try out the Bogus gateway, too: It’s a great tool to help you test if everything is running smoothly in the payment process.

Set up your sales tax
Another thing you need to set up is a sales tax, which is an amount collected by your local government. The exact amount you need to collect will vary depending on the type of product you’re selling and whether or not you're selling beyond your borders, which is why tax is inextricably linked to your shipping practices. We’ll cover those in a bit, so just sit tight!
Here at Shoplazza, your store’s tax information is stored under Settings > Taxes. That’s where you’ll be able to set up a tax profile, which will enable you to configure taxes for all the products that are being sold in your store.
6. Create About page and set up policies
Customers aren’t just interested in what a store is selling. They also want to know more about the brand they’re buying from―and, more importantly, they want to know how that business is treating their data and the steps they need to take should they ever need to return a product.
This is exactly why we also recommend you spend a little quality time crafting your About Us page and your business’ policies.
For the About page, try scouting some of your competitors online to see how they’re wording their mission and how they present themselves. Remember that this is the place where you can get creative and ― why not ― even a bit sentimental. It’s all about telling a story that resonates with your audience.
To create your About Us page, just go to Online Store > Pages. You’ll see a text editor next, so just insert your page’s title and start typing!
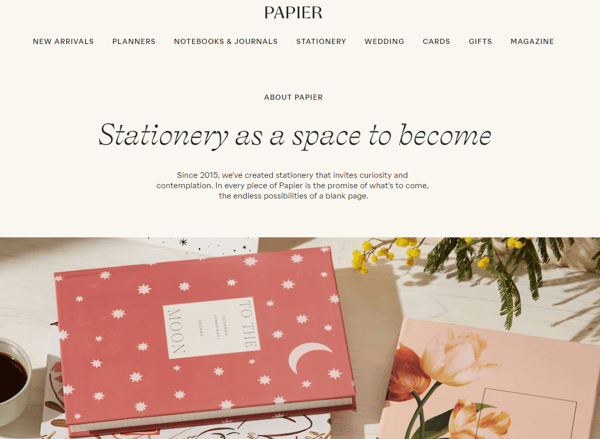
Papier’s About Us page is cute, artsy, and just really nice to look at. All of their relevant info is divided into small chunks of text to help the reading experience. After you read everything, it just makes you want to hop on their store and do some online shopping.
Business policies can be a little bit trickier, though, since you’re dealing with more sensitive topics that can have legal consequences.
To create a Refund Policy, a Privacy Policy and your Terms of Service, go to Settings > Legal. All three can be edited there, and guess what? Shoplazza offers you a default template for you to work with so you don’t have to make everything from scratch.
All you have to do is click on Generate default template, as shown in the image below:

👀 Worried about customer privacy? We can also help you set up a GDPR-compliant store. Check out our dedicated Help Center article on this topic.
📝 How to start an online store with Shoplazza: read this, too!
- Payment Setup (Help Center article)
- Theme Setup (Help Center article)
- Store themes (Help Center article)
- Taxes (Help Center article)
- How Does AfterShip Returns Center Streamline Product Returns?
7. Set up shipping
Shipping rates can either make or break an ecommerce business: If your shipping fees are too high, customers will get discouraged and won’t buy from the store. But if you start offering free shipping without giving it much thought just to captivate your audience, chances are you’ll end up having to increase prices just to cover up the added expense.
After all, free shipping means free for the customers. Somebody’s gotta pay for it, and it’ll be you.
How to start an online store with Shoplazza: Set up a shipping profile
Shoplazza works with shipping profiles, which allow you to set specific shipping rules for different products and locations. If you’re planning on working with a fixed shipping rate, then all you have to do is set up one shipping profile.
To create one, go to Settings > Shipping:
There, you’ll be able to work with different conditions, such as:
- Fixed shipping rate
- Shipping based on item weight
- Shipping based on product quantity
- Cash on delivery
📝 How to start an online store with Shoplazza: read this too!
- ePacket: Top Shipping Choice For Dropshippers
- Everything You Need to Know About Canada Post Packaging and Shipping
- A Quick Guide To Ship Fast and Save Money with USPS
- Secrets to Ship Your Products Faster and Cheaper by CaiNiao from Aliexpress
- Shipping Setup (Help Center article)
- Introduction To Shipping (Help Center article)
8. Monitor your store’s performance
You know who’s behind almost every successful online store? An entrepreneur that is responsible, attentive and is always analyzing every aspect of their business.
The truth of the matter is: Running a business online is tough work. It’s also constant work because you need to assess your performance continually to figure out what is driving good results and what needs to be tweaked further.
To do that, you’ll need a powerful analytics tool. One that can generate metrics, run statistics, and help you assess everything related to online sales ― from email marketing campaigns to abandoned checkout data.
So, meet your new Shoplazza best friend: the Analytics section.
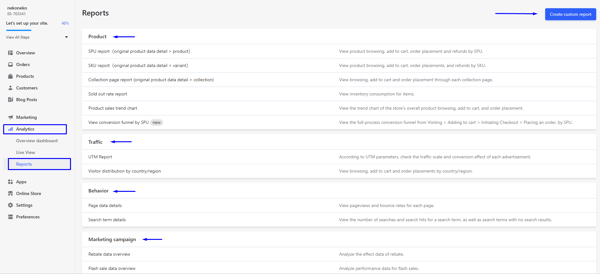
How to start an online store: Keep an eye on metrics
To unlock your Analytics panel, just go to Analytics on the left-hand menu of the admin. You’ll be able to see your data in three different visualizations:
- The Overview dashboard shows data from that same day. You can pick another timeframe and compare it to other periods in time and see how the store is doing in terms of visitors, orders, conversion rate, returns and total sales.
- The Live View is a really cool feature that shows a store’s activity in real time. You’ll see a world map, and on that map it’s possible to assess the countries where your visitors are located and how much you’re selling per location.
- Last, but not least, the Reports tab. It can generate lots of detailed reporting about your products, traffic, visitor behavior, marketing campaigns and your business’ finances, too. You can also create custom reports based on specific metrics and indicators by clicking on the blue button Create custom report.
📝 How to start an online store with Shoplazza: read this too!
- Allroot EPR Guide: A Powerful ERP Software for E-commerce Management
- Stamped: Loyalty Programs and Review Management to Engage Customers
- Everything You Need to Know about Google Performance Max
Extra tips on how to start an online store with Shoplazza
Eight steps is a lot of work already, but there are still a few tips we’d like to share on how to start an online store with Shoplazza. So bear with us just a little longer, okay?
Let’s have a look at some actions that can take your store to that next level right from the get-go:
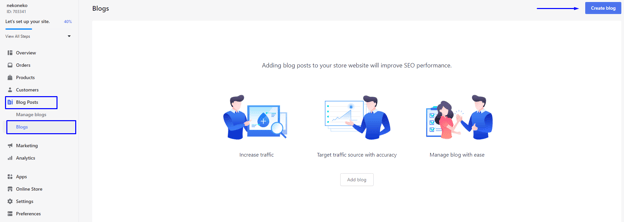
1. Start a blog
Starting a blog as part of an online store is a great strategy to drive traffic and hook repeat customers. You can also use that to create engaging content for social media and share some of the initiatives you’re proud of, like your green marketing partnerships.
To create a blog in your Shoplazza store, simply go to your admin and then click on Blog Posts > Blogs > Create blog.
2. SEO from morning to midnight
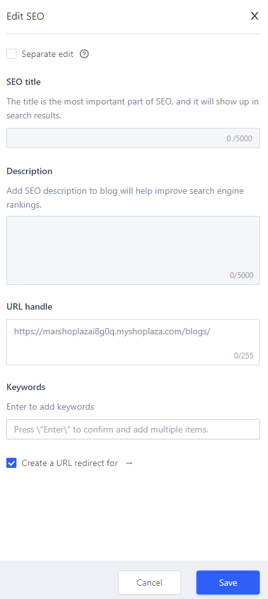
A great online store builder is always thinking of SEO, and guess what: Shoplazza is 100% committed to helping you conquer good rankings on search engines.
That’s exactly why pretty much every page you create for your store will have a dedicated field for SEO. Simply click on Edit SEO to see a new menu like this one:
3. Invest in customer service
As we’ve mentioned before, managing an online business is a lot of work―so you aren’t to blame if you find yourself in need of a helping hand. It’s ok to automate some aspects of an online business to free up some time, including customer service for online shoppers.
Apps like JivoChat are available in our App Store for that exact purpose, by the way. Just download them, set them up according to your target audience's needs and let those little bots work for you.
4. Test your store before going live
You can check out what your store looks like anytime you like during the whole setup process. All you have to do is click on the little eye icon right next to Online Store on the admin.
However, it’s also important to take a step back from the aesthetic and the buttons and the images to check if the user experience is working smoothly, too.
That’s why we recommend you test some of the features you’re offering: Go to a product page to see if all the necessary details are there, and click on the “Add to cart” button to assess the checkout page and verify if all payment options are working.
Also, try creating a refund or canceling some orders to make sure everything is good to go. You don’t want to risk having to figure all that out when a real customer is sitting on the other end, right?
Shoplazza exclusives for your ecommerce business
Wait! Before we call it a day, let’s also talk a little bit about some of the Shoplazza exclusives that are available for all of our merchants.
- Apps. We offer dozens of apps for all your ecommerce needs: from selling online to creating advertisements, from customer service to setting up shipping rates. Simply go to our App Store and take your pick! All of those apps are instantly integrated into your admin so you can start working right away.
- General checklist for opening ecommerce websites. We covered a lot of material in this post, but don’t forget to see our checklist for starting a new Shoplazza store. It was designed specifically for small businesses who are just starting out, and it will help you not forget any important details.
- Generate traffic to your Amazon store. If you’re already selling or are planning on selling on Amazon or other marketplaces, check out how you can use a Shoplazza store to drive traffic there, too. You can do that with a couple of apps directly on the admin!
- Lower break-even point. We’ve already discussed how a break-even analysis is important for a brick-and-mortar business and for online stores, too. A business’ financial health is not something that should be taken lightly, and that’s exactly why we offer different pricing tiers and built-in tools to help businesses reach their own profitability marks.
You’re doing great
And there you have it: All the basics on how to start an online store with Shoplazza. We know it’s a lot of info, so just take it slow and step by step.
One last thing, though: Remember that you’ll always be adjusting some tiny little detail, creating new pages or just adding new apps. A store is never 100% ready because it’s always being expanded, developed and optimized.
As soon as you feel like it’s time to make the move, just pick a plan and remove your password protection. This will effectively put your store out into the world.
Go for it! 💪🏾